aLoM's FrameBox
  • Main
  • Blog
  • Its 2013
  • Photos
  • Videos

SouthLake PermyJaya by NAIM

7/13/2014

0 Comments

 
Picture
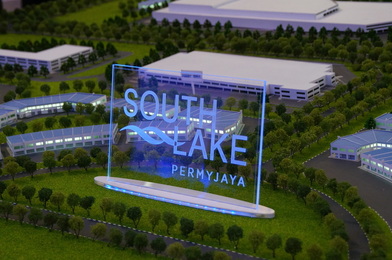
Thinking of purchasing a house?This could be your dream house!. Last Saturday, Naim Holdings Berhad launched their exclusive SouthLake Permyjaya development at the the ground floor of Permaisuri Imperial City Mall, Miri. Among the attendees was the Guest of Honour, Yang berhormat Datuk Dr Lee Kim Shin, Assistant Minister for Communitcations and Assistant Minister for Sports, Tourism, Sarawak , The distinguished Mayor of Miri City Council, Mr Lawrence Lai and Senior Manager of NAIM, Mr Zamry Ibrahim.  Before I proceed, here's a brief info of NAIM Holdings Berhad.

NAIM HOLDINGS BERHAD or better known as NAIM was incorporated in the year of 1993 with a start of its very first office at Bandar Baru Permyjaya. It's first project was developing the low-cost housing and also building the Pujut 7 bridge across Miri River which had given them much chances to grow. By now, they had more than fingers count awards and recognition from the state itself. I believe that's how they gained their brand name and reputation which give their customers the confidence for being so supportive after all these years.  For more information on the company and their projects, click here.
 

Picture
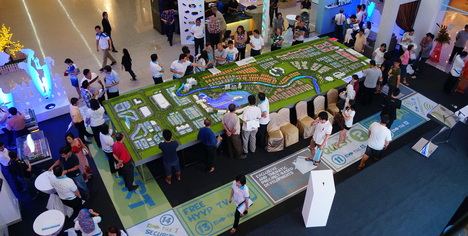
Back to the main topic, SouthLake is a chic, upmarket and precinct-based enclaved which as been master planned based on an appreciation for the environment, security and a healthy community living. Spanning over 450 acres,comprising of residential and commercial based components, its main feature is a 30-acre lake which provides the community with boundless lake side activities. One of the highlights of SouthLake is the Clubhouse,a nexus that promotes a close-knot community with facilities such as Badminton, squash and tennis court, Multi-Purpose Hall, Olympic sized swimming pool and much more. There will be educational centers, schools, commercial buildings and a Hospital within the vicinity as well.

Picture
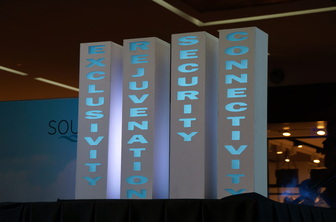
What sets SouthLake apart from the rest is the SouthLake Innovation New Generation (SLING) lifestyle which focuses on four main components which is,

  1. Exclusivity - A Clubhouse with full recreational facilities.
  2. Rejuvenation - A 30-acre scenic lake for all your outdoor activities,lush landscaping and a river flowing across the township
  3. Security - Precinct-based and a guarded sanctuary for total peace of mind living
  4. Connectivity - Smart-security features and high-speed broadband ready homes.

During the launch, NAIM introduced 2 components  within the SouthLake which was the Terraces Homes located in SouthLate Willow Moss Precinct and their Twin VIllas, which are semi-detached homes located in River View Precinct.All houses in the SouthLake Permyjaya is categorize as NAIM Signature Collection. What is this NAIM Signature Collection about?

Under this exclusive property brand, the costumers will get to enjoy products with branded finishes, multi-tiered security, benefits of integrated developments and value added services.
Picture
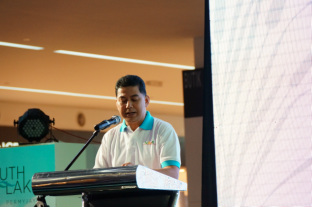
In his speech, Mr Zamry Ibrahim also urged customers to take advantage of the early-bird discount which is offered for a limited time only. Twin Villas are currently selling at a special price starting from RM 793,888 meanwhile Terraces ranging from RM 558,888 on wards. As for now, the project is already on its progress,and NAIM is is hoping the show house will be completed  by the end of this year and hopefully these two components that was mentioned earlier  would be completed within 2 years. In addition to that, the early bird customers free legal fees for S7P, free clubhouse membership, free High Speed Broadband(UNIFI),free Smart Security System with CCTV,web-enabled arming and disarming alarm, a panic button and a Central Monitoring System (CMS), free security guard services for 6 months (at precinct entrance) and pre-installed underground gass piping.

Picture
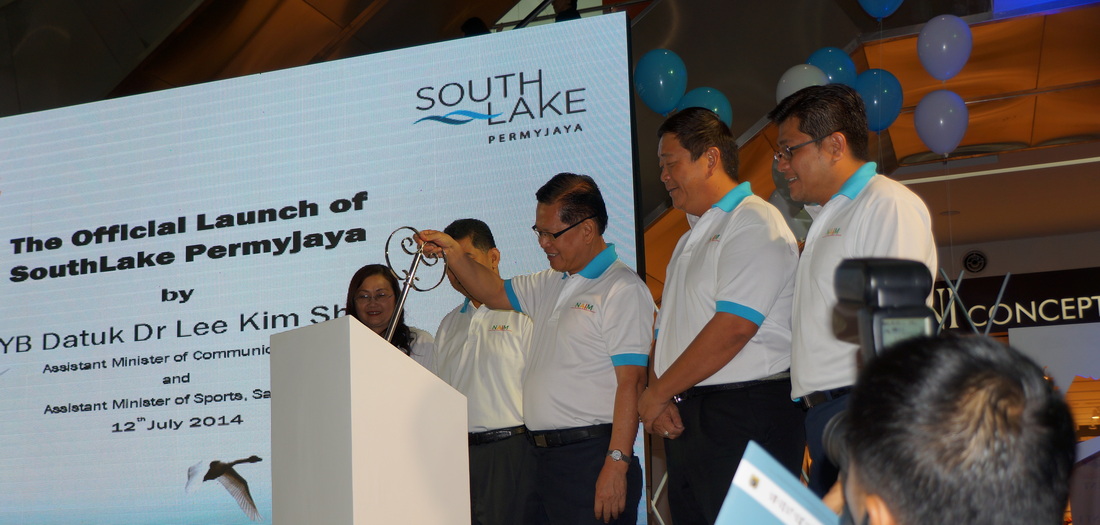
YP Datuk Dr. Lee Kim Shin, Assistant Minister for Communitcations and Assistant Minister for Sport officiating the launch of Southlake Permyjaya as Mayor of Miri City Council, Mr Lawrence Lai and Senior Manager of Naim, Mr Zamry Ibrahim looks on.
During the press conference, YB Datuk Dr Lee Kim Shin stated that Permyjaya will be a booming area upon the completion of SouthLake. Up to datem there's roughly about 16,000 properties within the area and the rough estimation of Miri properties is about 55,000. If my calculation is correct, Permyjaya alone contributed roughly 30% of the total properties in Miri. Once completed, SouthLake Permyjaya will add an additional 2,000 more to the current counts.
If you wish to know more about NAIM or Southlake Permyjaya, click on the link below for their website or their Facebook.

MIRI : (+60) 85 - 491000 , KUCHING : (+60) 82 - 422001 , BINTULU : (+60) 86 - 339666
Official Website : www.southlake.com.my 
OR 
Facebookpage : www.facebook.com/southlakepermyjaya
OR
Drop by at their office at the location below. 
Miri Sales Office : Lot 223 - 226, First Floor, Permy Mall, Bandar Baru Permyjaya, Miri.
0 Comments

Its A Passion

6/4/2014

0 Comments

 
PictureMy Cefiro on the far right.
Let me tell you a story about how I became a car crazy guy. I've always been into cars and how they work ever since I dropped by at mu uncle's work place where he works as a mechanic. I've always been the curios boy since I was small, I would take things apart just to figure out how they do what they did.

My curiosity has often ended up with me getting into trouble because I couldn't put them back together. When I got my first car, which was a Nissan Cefiro A31, which was given to me by my dad (he bought another car and the old one he gave to me). The car was equipped with a 2.0cc turbocharged engine with manual transmission. The car itself is a fuel guzzler and one trip from my house in Lutong to Bintang Plaza can easily drink up Rm10 worth of fuel. Being a student at that time, I didnt have much cash with me to do anything with the car. 

Because of that, after a few years driving that car, I talked to my dad and we sold of the car because i couldnt afford the maintenance of the car. After I sold of the car (that was back in 2008, I was aiming to buy a Satria GTi (every Malaysian men dream car back then), but it was too expensive and i couldnt afford it ( the Satria GTi cost roughly about RM40k second hand).


Picture
Not long after that, I came to know that Sarawak Shell Berhad was auctioning their company car. with the help of my dad, I managed to place a bid for an Proton Iswara Sedan 1.3cc for RM5k. the car was in terrible condition, the roof was rusted, 2 of the doors was having huge holes from the rust and the interior was all dirty. but what was important to me that time was, as long as the engine runs, I can make it work.The car was left at the yard for over a year before the bidding was opened for public. After that RM5K purchase, I spent another additional RM3k on fixing the rusted parts and a fresh coat of paint. From the original dark blue, I painted it silver and replaced the 13" steel rims with a set of wheels taken from the first generation of Proton Waja wheels. 

Picture
Slowly every month I started saving some money to "beautify" the car, adding bodykits, sound system, working up the interior, headlamp replacement at purchased 2nd hand seats taken out from a Mitsubishi FTO . The following year, I've ventured out with engine mods, and thanks to Google and forums, I slowly poisoned myself into modding the tiny 4G13 engine. Started off with Open Pods filter to short shifters until adjustable cam pulleys.

Picture
Sometime around year 2010, my thirst for power has reached its peak. I wanted more power but there's so little that the 1.3cc engine could do.. Again after I read a few forums and a lot of googling, I ended up with an engine swap. From a 1.3cc engine to a 1.6cc engine taken from a wira. The maximum i can go was 1.6cc as above that, I couldnt get the engine endorsed by JPJ. After the engine swap, more mods was done to the car and there's where i started doing a lot of DIYs on my car as I was modding my car on a tight budget. Alng the way i've upgraded the rims to a proper set of wheels and re-do the audio system to suit my preferences. 

Picture
Producing 107HP on wheels.
The modding slowed down and after that it was more of a fixing what needed to be fixed.. Alright, im not gonna bore you more on explaining, im just going to put a slide show on what was done to the car.
Less then a month after I've installed new bodykits and resprayed the car, on May 23rd, 2012, I was involved in an accident on my way to work. I was about 5 minutes away from my office as I drove pass by a housing area, I saw a white Toyota Hilux stopping at a junction.. Seeing that, I proceed driving normally until i was about 50 meters from the junction, the Hilux just came out of the junction. I tried to avoid crashing to him, I stepped on my brakes and I swerved to the right side going into the incoming lane but it was too late. I crashed into him and basically my whole left side of the car was badly damaged. At first i was keeping my cool but when I got out of the car, I saw the damaged, my heart just broke into pieces..  
I was car-less for 6 months after the accident.. The insurance process was fast but the workshop that was appointed by the insurance company just took their sweet time fixing my car just because its an Proton Iswara what broke my already broken heart more was the way the handled my car. After calling the insurance company headquarters(I guess the claim manager said something to the workshop), they started to work on my car the next day and within one week, my car was done. Workmanship wise was terrible but all I wanted that time was to get back my car. The moment I got my car back, I didnt drove it straight home but instead to my own workshop and got it fixed there. 

After that, I tried slowly fixing it back to its original state but you know what they said, once broken, it will never be the same. More and more problems came after the accident, it spent most of its time in the workshop rather then being driven. 

Picture
So last year, I decided to get another car. Fix the Iswara and sell it off after that. So I got myself the car that I always wanted to get. Yes.. The Proton Satria Gti 1.8. An the whole modification process starts again on a new platform. Progress is slow as Im still paying for the car. In 10 months time, I'll be done with the car loan and we will see how it goes from there. Currently the Iswara is in the workshop, getting some loving before being sold off.

Well thats about my three cars. When I'm not doing my car, I'll be doing something else to my friends car. Painting rims, center console, installing foglights, bodykits and such. Over the years I've learnt a lot about cars and when you're modding a car under a strict budget, DIYs is the way to go. Its an effective way to learn new things as long as you are willing to try and believe in yourself.
Someone asked me before, "if you love cars so much, why did you took IT instead of automotive?". Well here is the story behind it. I did wanted to take up automotive after if finished high school but my parents didn't agree to it. They questioned me on my  reasons and eventually I told myself, "its okay, my parents always wanted the best for me. They know what's best for me." So yeah.. Until today, Im still doing IT as a profession and I have to thank my parents for that. I was never a "technically attached person"and  I've always enjoyed getting my hands dirty. If my parents didn't asked me to take up IT, I dont think I know anything about how much things and information I can find online. Im really grateful that my parents actually forced me to study Information Technology. With that IT knowledge, Im able to utilize it to feed more knowledge and fuel my passion for cars. Well, Im looking forward to more car projects soon, be it my own car or others. till then, cheers!
0 Comments

How To Guide: Do It Yourself - Painting Your Rims

8/1/2013

1 Comment

 
Welcome back for another round of DIY (do-it-yourself) post. This time its not a DIY on my own car but a friend's car. It was an honour to be trusted painting a set of rims and the steps was similar to the valve cover except its in a bigger scale and more complicated because of the rims design.


But before you start, please keep safety in mind. Always make sure the handbrake is engaged or use a brick, tyre stopper before you jack the car up and make sure you jack the car on a flat surface.
As for the items needed/ used, the list is as follows.

  1. 3 tonne jack stand (1 pair at least.. but if you have 2 pairs, even better
  2. 2 cans of Hi temperature paint
  3. 3 cans of paint (colour of your choice)
  4. High pressure water jet.
  5. 2 decks of playing cards (i'll explain on this later)
  6. Sanding paper
  7. Paint remover
  8. metal brush (berus dawai)
  9. other items related to removing the tires from the car.
I started the project on Thursday night, right after work. the owner drove over to my place and we took out the 2 front tired and start removing the paint. The rims was previously painted 4 different times with 4 different colours and removing the paint was an exhausting task.

Picture
Picture
After removing the tires, apply a generous amount of paint remover on the paint coating. Be extra careful not to get the paint remover on the tires as it can and might cause leaks. Leave the paint remover for a bout 3-5 minutes before removing it. You can choose to use water and the brush but it will definitely take some time. Since I have the high pressure water jet, we decided to use that. Repeat the steps on all four rims until you get a clean, paint free surface.

Picture
A close up view of the paint remover effect on the paint. At the end of the night, We only managed to remove the paint from the front wheels. Around 1130pm, we put back the wheels of the car and rested as we need to go to work the next day.

Picture
unfinished business.. there was still some paint on the wheels.
As I was on half day leave on Friday, I continued with the project around 3pm. Jacked the car up, removed the wheels and start applying paint remover to the remaining paint. After successfully removing about 98% of the paint, I proceed with the rear wheels. Lesta came to help after he finished work and around 6pm, I set up some lighting so that we can continue till late night.
Picture
a little bit more
Picture
preparing to continue with the project at night.
Picture


somewhere around 8 or 9pm, Fabian came over with some food. We were so caught up and excited with the project, till we forgotten to eat. And not long after that, Raihanah came to chill for a while.

Picture


The makan buddies came to help out with the rims. And yes that a lady in the blue t-shirt.

Picture
Applying more and more paint remover to the rims.
Picture
Dengan penuh tekun sekali membuang cat menggunakan berus dawai. One of the rare kinds of woman who doesn't mind getting her fingers dirty.
We finally removed the paint off all the wheels around 1130pm and not long after that, a fellow friend called for happy hour. :P

So the next morning (Saturday) we started jacking up the car around 9am, removed all the wheels and started wet sanding. The purpose of wet sanding here is to remove the tiny bits of paints that was still on the rims and after the sanding, wash the wheels with dish washing detergent. 

Put the rims under the sun to dry it up and let the sun to heat up the rims. the paint dries faster this way.
 
Picture
Out in the sun drying. Notice there was still a few small patches of paint on the rims.
Picture
This is where the playing cards came to use. To avoid paint spreading to the tires, place the playing cards between the lip of the rims and the tires. Apply the card until the whole wheel is covered. Another alternative of doing this is by using masking tape and news papers but that would consume a lot of your time.

Picture
The rims ready for paint.
Picture
As for these rims, I applied 3 thin coats of high temperature  paint and let each layer dries up for about 10-15 minutes. Flip the rims over and apply the same amount of high temperature paint on the rims.Once you are satisfied with the paint coating, apply the colour coat of your choice. As for these rims, I applied 3 layers of matte/flat black paint. 

Picture
Mari kita tolong menolong..

Picture
Once you are satisfied with the paint coating, apply the colour coat of your choice. As for these rims, I applied 4 layers of matte/flat black paint.  and like the high temperature coat, leave the paint to dry up before applying another coat of paint. And finally apply 2 even coats of clear paint. As we wanted retain the matte looks, we applied the clear paint from a distance- roughly 1 meter from the rims (if you apply the clear coat like the normal paint, you will get a glossy finishing)

Picture
end result. Ultimate satisfaction.
Finally, put the wheels back on the car and you are ready to go!
Picture
Completed. next on the list is painting the callipers.
1 Comment

How To Guide: Do It Yourself - Painting Your Valve Cover

6/5/2013

1 Comment

 
Alright readers, this will be my first 'How To Guide: DIY" post and hopefully won't be my last. 

For this first DIY post, i'm gonna share with you on how I painted my valve covers. FYI, I have 3 valve covers in my possession up-to-date all painted by me. :D 
For this DIY, the tools needed is as follows

  1. Spray Paint (the colour of your choice)
  2. Masking tape
  3. Paint remover
  4. Brush
  5. High pressure water jet/ pressure pump
  6. Abrasive paper AKA sand paper (400 and 800 grit)
  7. Gasket maker/gasket glue
  8. Rubber gasket (optional)
Picture
First of all, remove the valve cover from your engine bay,(in my case, i purchased another valve cover from one of the Facebook page and got it posted over-no removal required.) and prep it for paint removal.. When i got the VC, it was already painted black by the previous owner and the paint had a few scratches and chips at the edge(I'm guessing that the previous owner didn't use high temperature paint as base coat and it has already been painted 3 time previously - red,blue and black)

Picture
To remove the old paint, I used this paint remover which can be purchased at most hardware store. Please be extra careful when using this product as it is extremely acidic. Use it in a open area where you have good ventilation and avoid direct contact with the liquid.

Apply the paint remover using a small brush and leave it for a few minutes until you see the paint start lifting itself from the valve cover. Remove the residue using flowing water or using a high pressure water pump/water jet. You may need to repeat the steps until all the paint has been removed from the valve cover.

Picture
This is how the valve cover looks like after all the paint has been removed.
Picture
Next step is to sand the valve cover using the 400 grit abrasive paper and prep the valve cover. cover all the holes that you do not wish to paint using the masking tape. and apply 3 even coats of high temperature paint as the base coat. I recommend using high temperature base coat as the valve cover tends to get hot and without the high temperature base coat, the paint will chip and cracks over time.

Picture
After the high temperature paint dries up, its time to spray the valve cover with the colour of your choice (I chose metallic purple). LIke the other valve covers i did previously, I applied 3 even layers of paint coat. Wait 10-15 minutes for each layer to dry. 

Picture
After the paint dries, I prepped the valve cover for another round of sanding. Taped up the side of the letters to protect the paint just in case you over shoot the sanding process. Using a flat block of wood wrapped up with the 800 grit abrasive paper, rub away all the unwanted paint until bare metal is exposed. I suggest you use the wet sanding technique. 

Picture
Done with the wet sanding and this is the result.
Finally, spray 2 layers of clear paint to protect the newly painted valve cover. Re-install the valve cover on the engine. Don't forget to apply gasket marker along the sides of the valve cover and the spark plug holes. If the valver gasket has hardened, replace with a new valve gasket which can be easily purchased at auto part shops.
Picture
Finished product before installation.
Picture
In case my dear readers is wondering how high temperature spray paint looks like. Take note on the 3 stars before the colour code. For DPI Anchor brand, high temperature paint only comes in two colours - Black and Silver.
Picture
the other 2 valve covers that I painted using the same steps as above. 

- the blue(top) has been resprayed to candy purple. Currently on my engine.

- the blue/gold broke when i got into an accident last year.


Hopefully this DIY project of mine can help and guide you with your valve painting project. Till next time! Chio~
1 Comment

    Petrus Kalom

    - Iban
    - Sarawakian
    - Malaysian
    -  Cars
    - Dog Lover
    - Good Music
    - Photography
    - Friends 
    - Family

    Archives

    July 2016
    June 2016
    September 2015
    August 2015
    April 2015
    March 2015
    October 2014
    September 2014
    July 2014
    June 2014
    May 2014
    April 2014
    March 2014
    December 2013
    October 2013
    September 2013
    August 2013
    July 2013
    June 2013
    May 2013
    April 2013
    February 2013

    Categories

    All
    2013
    2014
    2015
    2016
    4g9x
    Aloms Garage
    AMF
    AsiaMF2014
    Borneo Jazz
    Car
    Cinema
    Coverage
    D.I.Y
    Events
    Festival
    GTI
    Happenings
    How To Guide
    How To Guide
    Miri
    Mitsubishi
    Music Festival
    Myvi
    Paint
    Perodua
    Photo
    Project
    Proton
    Proton Iswara
    Purple
    RWMF
    Sarawak Bloggers
    Sarawak Tourism
    Satria
    STB
    T.G.V
    Tourism
    Valve Cover
    Visit Malaysia 2014 (VMY2014)

    RSS Feed

Powered by Create your own unique website with customizable templates.